PN#453ANK 3")
 Unassembled PN#453ANK 44")
 Unassembled PN#453ANK 40")
 Unassembled PN#453ANK 41")
 Unassembled PN#453ANK 42")
 PN#453ANK 2")
 PN#453ANK 7")
 PN#453ANK 6")
 PN#453ANK 4")
 PN#453ANK 5")
 PN#453ANK 3")
 Unassembled PN#453ANK 49")
 Unassembled PN#453ANK 47")
 Unassembled PN#453ANK 46")
 PN#453ANK 1")
 Unassembled PN#453ANK 45")
 PN#453ANK 4")
 PN#453ANK 5")
 PN#453ANK 6")
 PN#453ANK 8")
Description
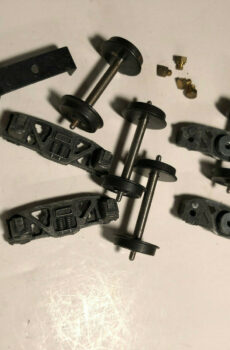
For Sale: All Nation Gas Electric Truck KIT 36″ Wheels Insulated 1 side, Ball Bearing (1 Pair) UNASSEMBLED PN#453ANK
Note: This purchase is a KIT. Doodlebug photos are for demonstration purposes only. Car is not included in this sale.
Suburban Electric Four Wheel with 36″ scale wheels 3D printed PC/ABS. The original Suburban Electric Four Wheel truck was available from Walthers as a zamac die cast product and later from All Nation Line. Our newest version is 3D printed with Poly Carbonate filament blend and is not a sprung truck. The coil springs are a substitute for what was previously die cast to look like a coil, thus these look more realistic to prototype. The leaf spring is printed using TPU 98A and also looks more prototypical. This kit comes with bolster side frame screws and ball bearings for the axles fitted into the journals.
Parts List:
4 Side Frames
4 Side Frame Bolster Brackets
2 Bolsters
8 2-56 x 3/16″ Flat Head screws
8 Ball Bearings
4 Leaf Springs
8 #1544 Coil Truck Springs
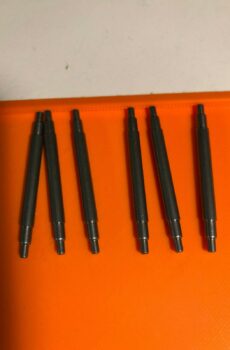
4 36″ Wheel Sets Assembled onto axles with 1 side insulated
Required tools for assembly:
3/6″ Drill Bit
1/8″ Drill Bit
#50 Drill Bit
#42 Drill Bit Clearance
2-56 Tap
CA & JB Weld Qwik glues
All drill bits must be sharp for clean precise holes.
Assembly Instructions:
First layout all the parts and account for all in the list above and read these instructions carefully to understand the process to assemble the parts.
Second, check all the plastic parts for flash or printer threads. Some clean up may be required.
Third, Using the 1/8″ bit, drill out each journal centers to a depth that accommodates the length of the axle from the end to the face of the wheel. We recommend a small drill press to set the depth so as not to drill through the journal box. Drill bits tend to bite into plastics so hold the side frame firm or secure it such that it will not climb the bit. Do this to all the journal holes.
Fourth, Using the 3/16″ bit, drill the journals to accommodate the ball bearings. Drill them only deep enough so that when inserted, the bearing is flush to the side frame although if it does stick out a little it may rub against the insulator side of the wheel in which case the insulator might need to be trimmed flush with the face of the wheel.
Step 5. Lay the side frame on some parchment paper with the back side down. Insert the coils springs and position them. Use a drop of CA on the back side to secure the spring. Do this for all 4 side frames.
Step 6-A. Included in this kit are 4 bolster brackets. The top side you will note are 2 small holes. Using the #50 bit, drill the hole through and then use the 2-56 tap to cut the threads for the 2-56 screws.
Step 6-B. Included in this kit are 4 bolster brackets that cement onto the back side of the side frames. These must be centered and initially use a drop of CA to position and tack them on and align the center part to the center hole that is visible on the back side of the side frame. Once the CA is set, mix some JB Weld and fill in the center hole making sure to get the glue all the way into the side frame hole and let it set hard. This will give added strength to the truck once assembled.
Step 7. 2 Bolsters come with this kit. 2 holes on each edge of the bolster must be drilled using the #42 clearance bit for the 2-56 screws. A light counter sink can be done if so desired however, secure the part upon doing the counter sink so it does not climb the bit or set the depth. Go slow is the best recipe.
Step 8. At this point, fit the bearings into the journals as they should be snug.
Step 9. Using 2 of the 2-56 screws, mount the bolster to 1 of the side frames.
Step 10. Finally assembly procedure will be to hold the truck side frame with the attached bolster in your left hand and insert the insulated wheel sets into the journal bearings. Take the other side frame, bring it to insert the non-insulated side of the wheel sets and using the other 2 screws mount the bolster to the side frame bracket. Tighten the screws but do not over tighten. Take the leaf springs and insert them from the outside of the side frame. Center them and push them in so that they do not stick out further then the journal boxes. Turn the truck upside down and put a drop of CA on the leaf spring to glue it in place on the side frame or the bolster bracket.
This concludes the procedure to build out the truck ready to roll.
Note: Doodlebug kit is sold under separate cover at the following link: All Nation Line Gas Electric “Doodlebug” Kit Basic 75′ (minus trucks/details) PN#3642